x

SketchUp

iMapper exports STL and DXF files for SketchUp from laser-scanned room measurements with ±2mm (0.08 in) precision.
Company:
SketchUp
iMapper + SketchUp: From Room Scan to 3D Model in Minutes
STL and DXF export from measured site data. Model in SketchUp on real room geometry with ±2mm (0.08 in) precision and 10 portrait reference photos.
STL + DXF export · ±2mm (0.08 in) precision · 10 portrait photos
Import menu path:
File > Import > select .stl file (STL, all tiers including SketchUp Free) or File > Import > select .dxf file (DXF, requires SketchUp Pro or Studio)

iMapper integrates with SketchUp to give designers, architects, and kitchen and bath pros millimeter-accurate room measurements ready for 3D modeling. You place iMapper in the middle of the room, press the button once, and walk away. Three minutes later you have a complete capture of walls, doors, windows, and recesses at ±2mm (0.08 in) precision, with 10 portrait reference photos linked to each scan position. Export to STL from the iMapper platform to bring 3D wall geometry straight into SketchUp (Free, Go, Pro, or Studio), or export DXF to load point clouds and polylines as a 2D reference in SketchUp Pro. Real room, real geometry, in the software you already model with.

Benefits

±2mm (0.08 in) Measurement Accuracy

iMapper's laser captures over 1,200 points per minute at ±2mm precision. What you model in SketchUp matches the room that was actually there, so no return visits and no guessing from hand sketches.

Two Import Paths: STL or DXF

STL brings 3D wall geometry straight into SketchUp Free, Go, Pro, or Studio, ready to push, pull, and dress with materials. DXF brings 2D point clouds and polylines into SketchUp Pro and Studio as a reference layer for tracing floor plans.

One Visit, Full Room Capture

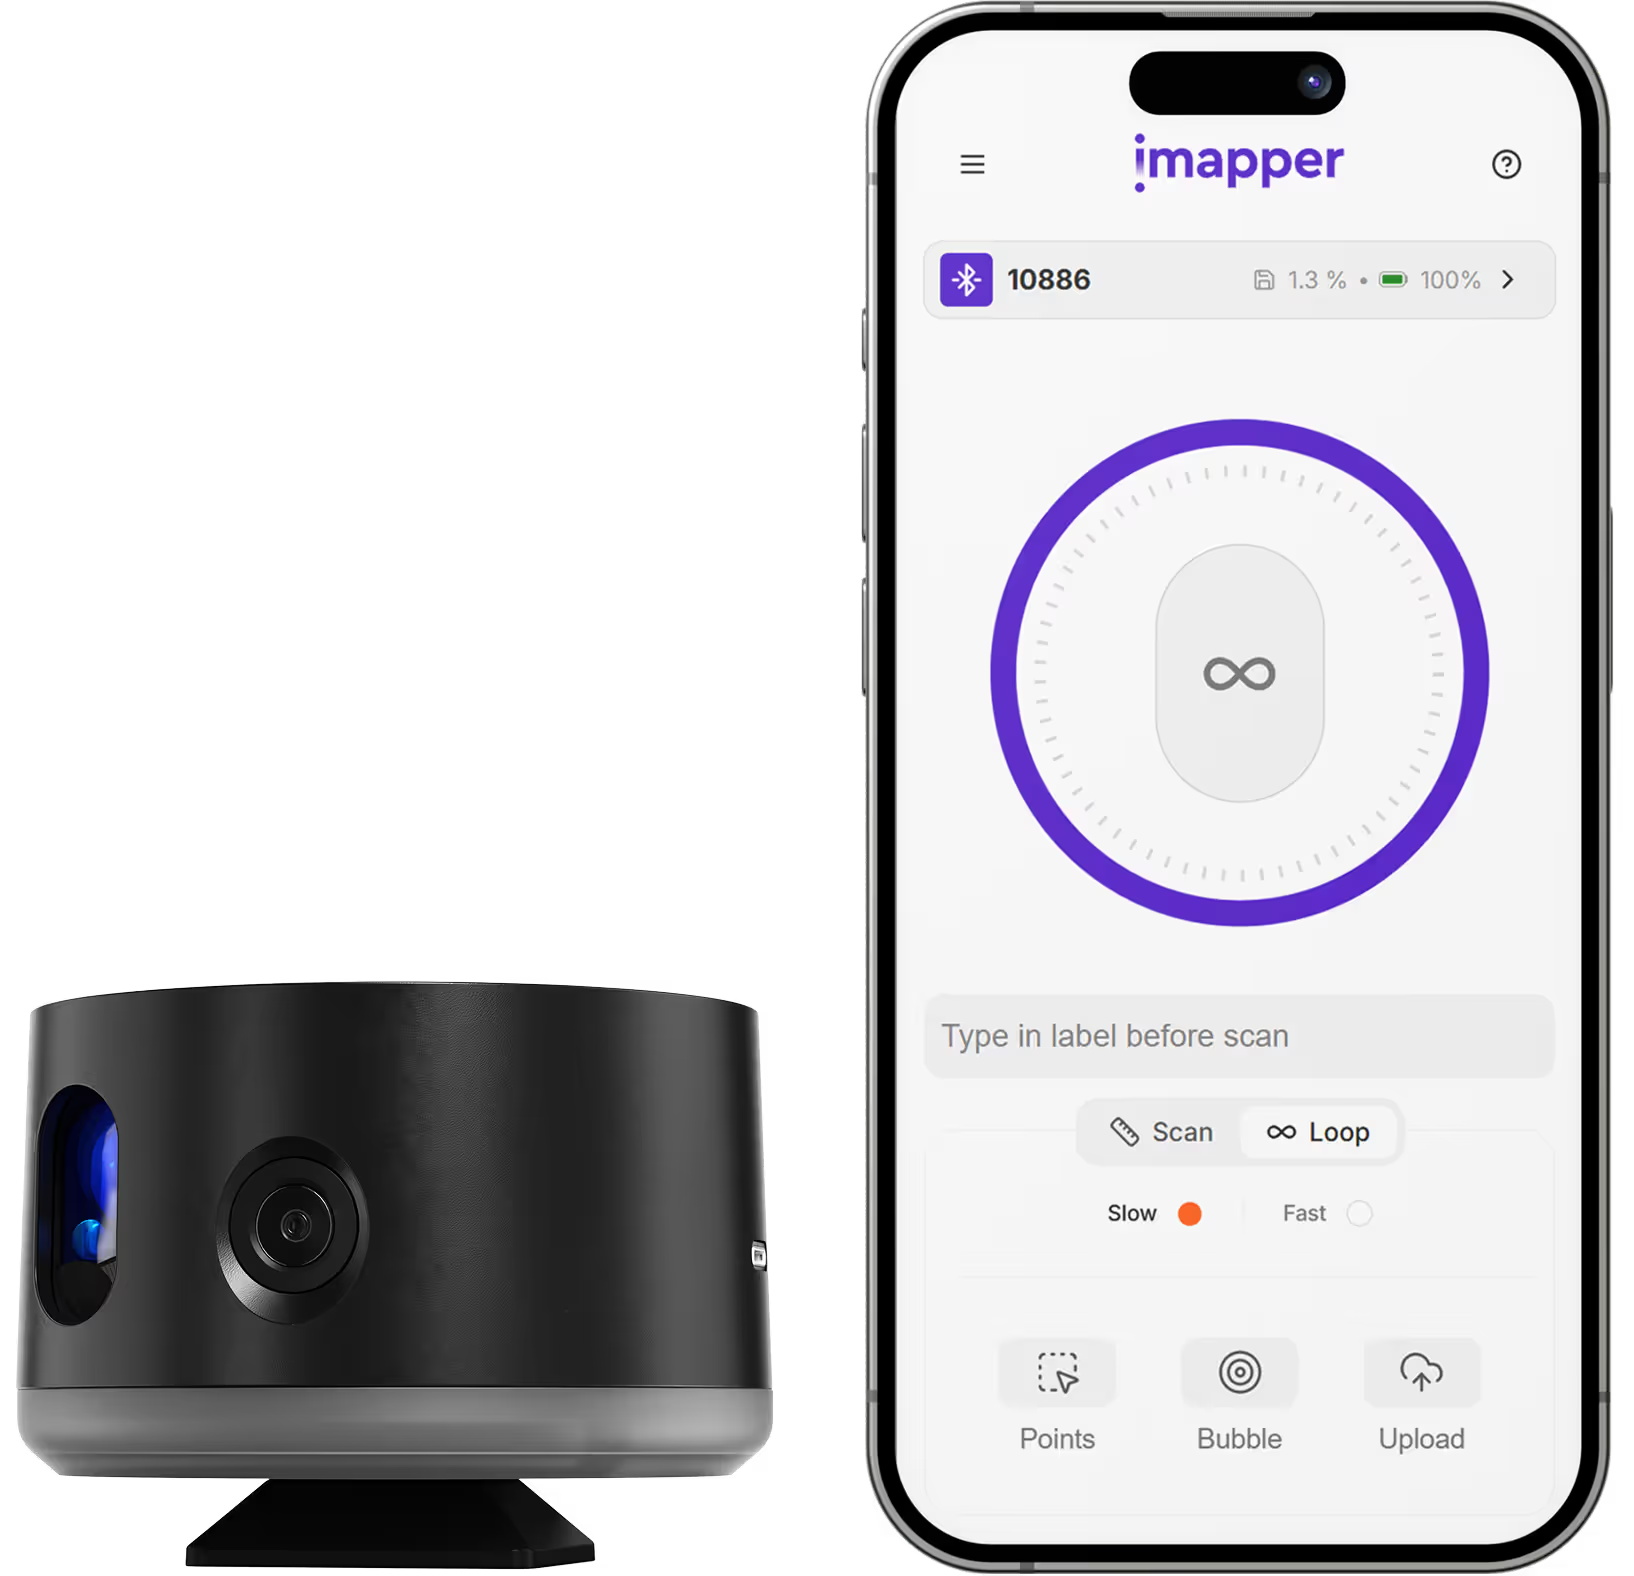
Place iMapper on its tripod, press once, walk away. Three minutes later the room is captured, including 10 portrait reference photos you can cross-check any detail against from your desk.

Workflow steps

Step 1: Capture the site with iMapper

Place iMapper in the middle of the room and press the button once. The scan completes in 2 to 3 minutes and captures ±2mm (0.08 in) measurements along with 10 portrait reference photos at each scan position.

Step 2: Upload to the iMapper platform

Transfer via SD card or the iMapper Connect app. Scans stitch together automatically into a complete room on platform.imapper.tech.

Step 3: Export to STL or DXF

From the platform, click Export and choose STL for 3D wall geometry or DXF for 2D point clouds and polylines. Both support metric and imperial units.

Step 4: Import into SketchUp

File > Import, then select your .stl or .dxf file. For STL, check 'Merge coplanar faces' in the STL Import Options so walls come in as clean surfaces instead of many small triangles. DXF import is available in SketchUp Pro and Studio.

Step 5: Start your 3D model

STL gives you walls ready to push, pull, and dress with materials. DXF gives you a 2D reference to trace over while you build the model in 3D. Either way, your geometry comes from the real room.

Step 6: Verify with photo cross-reference

Uncertain about a recess, a pipe run, or a window reveal? The 10 portrait reference photos captured during scanning are linked to the scan positions in the platform, so you can check any detail without going back to site.

iMapper captures complete 2D room geometry and wall surfaces, not dense 3D point clouds of full buildings. For large-scale exterior scanning or millions of points across an entire site, a stationary 3D laser station is a better fit.

Use cases

Interior Design

Start SketchUp models from real room geometry, with walls, doors, and windows already placed, so you can focus on the design instead of redrawing the container.

Renovation Projects

Capture the existing space before any demolition or design work begins. Your SketchUp model starts from accurate as-built data, not rough site notes.

Kitchen and Bath Design

Precise wall lengths, recess depths, window positions, and ceiling heights give you the base to lay out cabinetry and fixtures in SketchUp without surprises at install.

Client Presentations

Build a 3D base model from the real room, then render walkthroughs that clients recognize as their space, which makes design decisions easier to approve.

Category
General Design
Useful for
Interior Designer
Output Formats
STL, DXF
Recommended Format
STL
Accuracy Statement
±2mm (0.08 in) precision
Units
Metric and Imperial
Supported Versions
SketchUp 2021, 2022, 2023, 2024, 2025, 2026
Last Updated
April 22, 2026

Frequently asked questions

Need something cleared up? Here are our most frequently asked questions.
What file formats does iMapper export for SketchUp?
How accurate are iMapper measurements in SketchUp?
Do I need a plugin to use iMapper with SketchUp?
What versions of SketchUp are supported?
Can I verify measurements if something looks unclear?
What projects work best with iMapper + SketchUp?
How long does the workflow take?
What is the difference between STL and DXF export for SketchUp?

Explore all our integrations

How

Interior Designer

s

are using iMapper

Discover how companies streamline scanning, standardize operations, and speed up decision-making using iMapper’s camera-powered visual data system.
Albert Dubler
Architectural firm
iMapper is easy to use, even for people like me who find it harder to learn compared to younger people.
Albert Dubler
atelier-darchitecte-albert-dubler
Read Customer Story
Dimitri Bodiansky
Architectural firm
It’s one of the tools I can no longer work without.
Dimitri Bodiansky
latelier-des-batisseurs
Read Customer Story
Discover iMapper
functionality in 15 minutes
Book a non-binding demo call to see how iMapper Hardware and Software work and improve your measuring workflow on-site and in post production.